
Key Differences for Teacher Tests
- Any Teacher/Proctor can Proctor the Teacher Test Section.
- The Teacher Test can be taken synchronously or asynchronously.
- In the event of asynchronous testing, the Test remains “Open” until the final teacher completes the Test and ARK closes the testing window.
- Teachers use their existing login and access the Test from their Dashboard.
You add a Teacher Testing Section in the same way you add a Student Testing Section. (See Administrator Guide, Add Testing Sections for reference.)
- Navigate to the Testing Sections menu selection. Select the +New button in the upper-right corner of your screen.
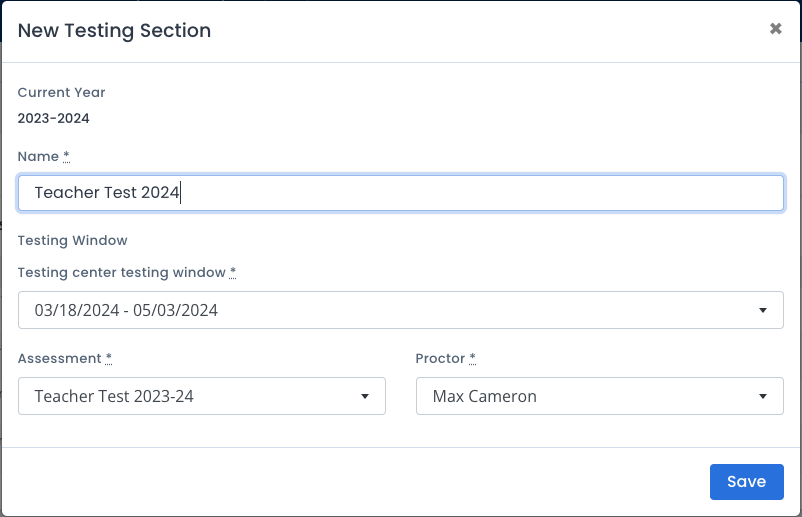
- Enter the Testing Section Name. This should be a uniquely identifiable name so that your reporting Dashboard is easy to read.
- Select the Testing center testing window.
- Select the Teacher Test Assessment.
- Select a Proctor from the drop-down window. This can be any existing Teacher/Proctor who will Begin and Close the Section for the group.
- Hit the “Save” button and you will return to the list of Testing Sections.
Adding Teachers and Admins
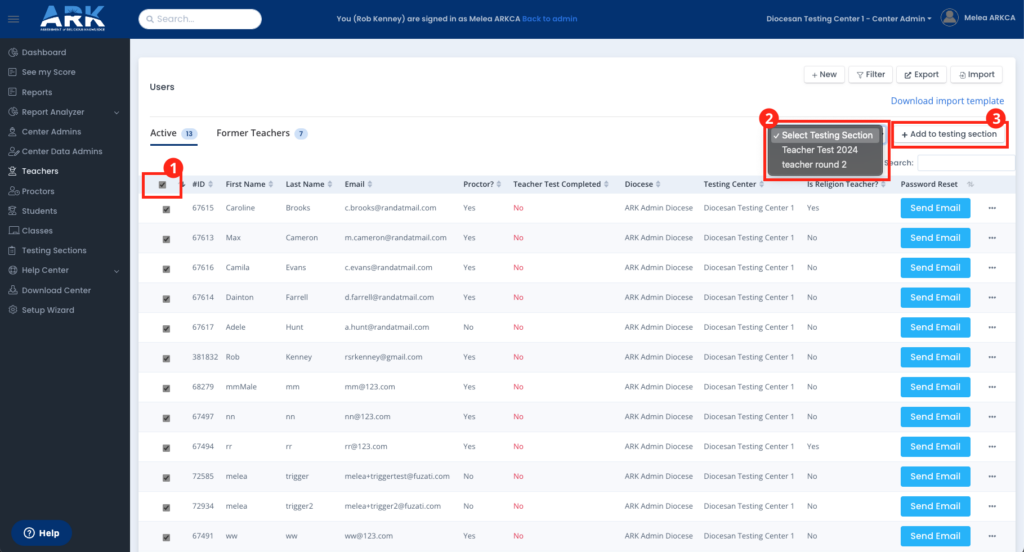
- To add Teachers to the Testing Section in bulk:
- Navigate to the Teachers list
- Select All teachers using the check box in the table header, or manually select the desired teachers.
- In the drop-down on the right side, select the newly-created Teacher Testing Section
- Click +Add to testing section
- To manually add Teachers and/or Administrators to the Testing Section:
- From the Testing Sections list, select the ellipses button at the far-right side of the Teacher Testing Section. Select “View” from the pop-up menu.
- In the next screen, navigate to the “Teacher” tab and then select the +New button in the upper-right corner of your screen.
- A New Teacher window pops up, and you can select your Teachers from the drop-down menu. You can then select between the blue “Save & add more” button and the gray “Save & close” button. If you need to add more Teachers, use the blue “Save & add more” button; when finished, select the gray “Save & close” button.
- Confirm you have all Teachers listed. You are ready to administer the Teacher Test.
NOTE: You can also add the Center Admin and Center Data Admin if you choose.
Start the Teacher Test
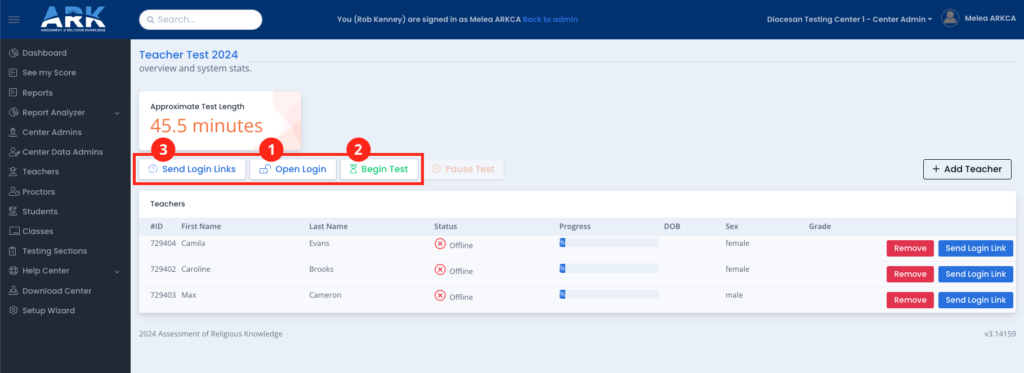
- Open the Teacher section Testing Dashboard.
- Click Open Login
- Click Begin Test
- Click Send Login Links
All teachers listed will receive an email with a direct link to their Teacher Assessment. The email will be sent from [email protected].
NOTE: You do not need to close & lock the Teacher Testing Section. ARK will close all Teacher sections at the conclusion of the testing window.
